Well, it's official! Summer is over here in my neck of the woods. I returned to work this week for planning sessions by department as we get ready to implement new standards and new curriculum. I'm really excited by how much I accomplished and my expectations for the new school year. I work with an awesome group of people who make coming to work after a long break much more bearable! I made these little books for some of those peeps.....I wish I had the time and resources to make them for everyone! The image is from Art Impressions and it speaks volumes about how we are all going to feel by the end of next week as we get our rooms, plans, and other assorted requirements ready for the kids who will arrive on the following Monday! Did I mention the endless hours of trainings we have to work around to get our stuff done?
I made the notebooks refillable and even supplied each recipient with a small supply of refill pads!
The pads are the biggest hangup to making more of the books. I have bought all I have found, which are very few. Must be a hot item for the new school year as I usually see them everywhere. Have some of stampin' peeps on the look out, too.
Time to get some more planning done before the whole house wakes up and then some fun time later today as it's the last Friday of the summer!! Hope it's a good one for all of you and thanks for stopping in!!
Showing posts with label gift. Show all posts
Friday, August 10, 2012
Thursday, March 22, 2012
Zentangle Gift Box
I found this gift box to hold a bottle of wine or some other spirits on a clearance table at the LSS. It was solid white with just the black ribbon closure. I immediately thought it would make a great Zentangle project so I bought it and amazingly, the tangling got done within just a couple of weeks. But that's where the forward progress ended for a while. It took forever to get out the can of clear sealer and spray it. Then it took several more days to add the paper, ribbon and tag. I bought the box over Christmas break and finally completing this project on Spring break!
The paper at the bottom is by Queen and Co. and the pleated ribbon is SU!
I received the die to make the flower from a dear friend as an early birthday present. It's by Memory Box. They make some of the prettiest dies...so intricate and elegant!
Now, what to use it for? I decided to stamp the tag for a birthday gift. I wanted to take a photo of the box opened up, but I didn't want to leave it empty for the photo. Hubby and I don't drink (alcohol definitely comes under the heading of processed foods) so I found the only appropriate bottle I had in the house...a bottle of cane syrup from the a friend of the farm!! (Hubby's not off the processed foods)
Well, that's three incomplete projects that have been put to bed for me over Spring break so far. The other two are sets of cards I had started using Northwoods stamps. Both sets still needed the finishing touches of coloring and glitter added to them and I got that done yesterday. Today, I'm off to find the floor of my stamp room and maybe even the table!! Wish me luck!!
Sunday, January 29, 2012
Another Addiction
October???? Seriously!!! I have completely neglected my blog!
I have been so busy lately. I started classes towards my Autism Spectrum Disorder endorsement. That happens most Saturdays and of course there is homework to go with it. Like the crazy woman that I am, I also signed on to do two nights a week for the Reach for the Stars after school program which puts me at work until at least 6:30 twice a week. I already stay late most days, but now I also have planning to do for this and the time I spend with kids after school means I have to find other time for the planning, grading, etc. that I used to do on those two days. I must be truly nuts!!
Anyway, I have managed to get in a little bit of creative time between all of the insanity. I started playing with Zentangle about a year ago and I made a tangle with my daughter-in-laws name as the basis for the design. I was going to frame it, but I cleaned my stamp room (again) over Christmas break. I even super-cleaned the closet and found a bunch of items I had collected to be altered. Soooo, I ended up attaching the tangle to the cover of a small journal. Since Linda loves to journal and write poetry, it seemed like the perfect way to present my artwork! So, here it is!!
Here is a closer view of the design:
Hopefully I will get back again sooner. Thanks for stopping in....I really miss sharing with my blog friends! I'll be around later (after granddaughter goes home) to see what you have all been up to!
Sunday, October 23, 2011
Cheryl's Madison Flip Book
The flip book I made for my friend's daughter. One of these days, I'll get it in the mail to her! So hard to get to the post office when they are actually open when you live in a little cow-town. I used Little Yellow Bicycle dsp and matching accessories. The card stock is Bazzill. Thanks for stopping in!!! I know I've been absent a lot. Working on classes again and when you add in regular work and grandbaby time, there isn't much time left over for personal pursuits!
Wednesday, August 10, 2011
I'll try to be nicer...
I wanted to share a project I made for a dear friend of mine. As soon as I saw this Bugaboo image, I knew it was perfect for her. My friend works in a computer lab at one of the local high schools and this image completely reflects her outer personality. One thing about Nancy, you never have to wonder what she's thinking! She's a little crusty on the outside, but she has a heart of gold and I just love her! But what else could you expect from an ex-Miami cop? Guess you have to have a little attitude to survive there!
Anyway, this project was over a year in the making. Getting the image, blowing it up, and getting it colored was the easy part. When that was finally done, I realized I didn't have a frame to fit it after all. But I remembered that the LSS had exactly what I was looking for on their clearance rack....so off I went to get it. Well, not exactly. It was more like trying to remember to get it when I was in the store which is harder than you might think! You see, I have a little problem with follow-through unless I write it down. Anyway, by the time I remembered, the store had put away the items on the clearance rack to make room for more new stuff and an up-coming move. They were sweet enough to dig it out of the store room for me and I finally had the frame at home.
Of course, because I have follow-through issues, the frame sat untouched for almost another year before I got it out and got it painted. From there it was pretty quickly accomplished. I layered the image on some retired Tango Tangerine dsp and finished it off. I even managed to get it delivered within the week and she loved it! In fact, even though she is sure it will get her in trouble, she says it will proudly hang in the computer lab. She says her kids will totally get it.
Well, I had fun making this little project even if it did take me forever to complete. Hope you liked it too!
Tuesday, August 2, 2011
Butterfly Box
I have come to the conclusion that I need my job to provide a time structure for my life. Too much free time just isn't a good thing for me. Without any long term classes to take and lots of stamping time on my hands, I pictured getting amazing things accomplished. Alas, I have only piddled with a few projects, though a couple of them were more involved. This butterfly box is an example.
A friend of mine requested a card box for her daughter's baby shower later this month. The theme for the baby's room and the shower is butterflies, so this is what I came up with. I used an empty box that I found in my closet (had a bunch of coffees and cocoas in it originally) and covered it with pink butterfly papers. The butterflies were covered with a two sided adhesive and then cut with a Spellbinder's die. After cutting, I removed the top layer of adhesive and covered the butterflies with micro-fine glitters in pinks and greens. Strips of acetate allow the topmost butterflies to "hover" over the box.Here's a close up of a couple of the butterflies so you can see the glitter effect.
Now that I can smell the books and dry erase markers looming on the horizon, I am going to try to make the last couple weeks of summer vacation more productive. Off to create!!!
Wednesday, March 23, 2011
Button Trays
A few weeks ago, I saw a post on someone's blog in which a button design patterned paper was used to line the bottom of a tray. When I saw it, I immediately thought of the 30,000 or so buttons I have stashed in my room. I used many of the older buttons that belonged to my grandmother who removed them from every piece of clothing before it finally hit the rag bag. She NEVER through anything away until it had been used to the point of disintegration.
With my project in mind, I started looking for an inexpensive wooden tray in which to adhere my buttons. After attaching the buttons to the bottom of the tray with Diamond Glaze, I allowed them to dry completely. Then I poured a coat of casting resin over the whole thing so that the buttons were completely covered. I actually made two of these trays because I knew that if I liked the result, I would want one too. I will be taking one to my friend and co-worker who has a bit of a button fettish. I told her I was going to bring her some of my button collection on Thursday, she just doesn't know that they are attached to the tray. Here are a couple more shots of the trays.
Friday, December 31, 2010
Boy Flip Book
Today, I'm posting the second of the two flip books I made over my break. This one is for a boy. For this one, I was able to use papers and embellishments from my stash except for the buttons. I didn't have any buttons with me when I made the book, so it was a great excuse to buy some more. I really needed those buttons, because I am down to a mere 50,000 or so in my stash which puts me in severe danger of running out! :0) So here's the book!
I plan to see 2010 out by stamping and crafting and then bring in 2011 the same way. Headed of to the LSS (Priceless) both days to spend a little creative time with my stampin' besties!! Happy New Year to all!!
Thursday, December 30, 2010
Baby Girl Flip Book
I had to make a couple of flip books over the break. Actually had these done before Christmas, but didn't have them photographed before they go off to their owners. Both are very late!!! I will show you the girl book today. It was made primarily in purple, with touches of green for a secondary color. The papers actually all match very well, but I couldn't get them to photograph or adjust correctly...probably all in the operator :0)
I really love making these books and they seem to be very well received when I give them as gifts. Most of the papers and embellishments are by DoodleBug along with some other misc. papers from the LSS. Had a hard time finding matching stuff in purples. I'm amazed I didn't have anything in my stash. Who says I have too much stuff? Obviously I don't or I would have had everything I needed for this project in my stamping room!! Thanks for stopping in today!!
Monday, November 22, 2010
Something to warm you up!
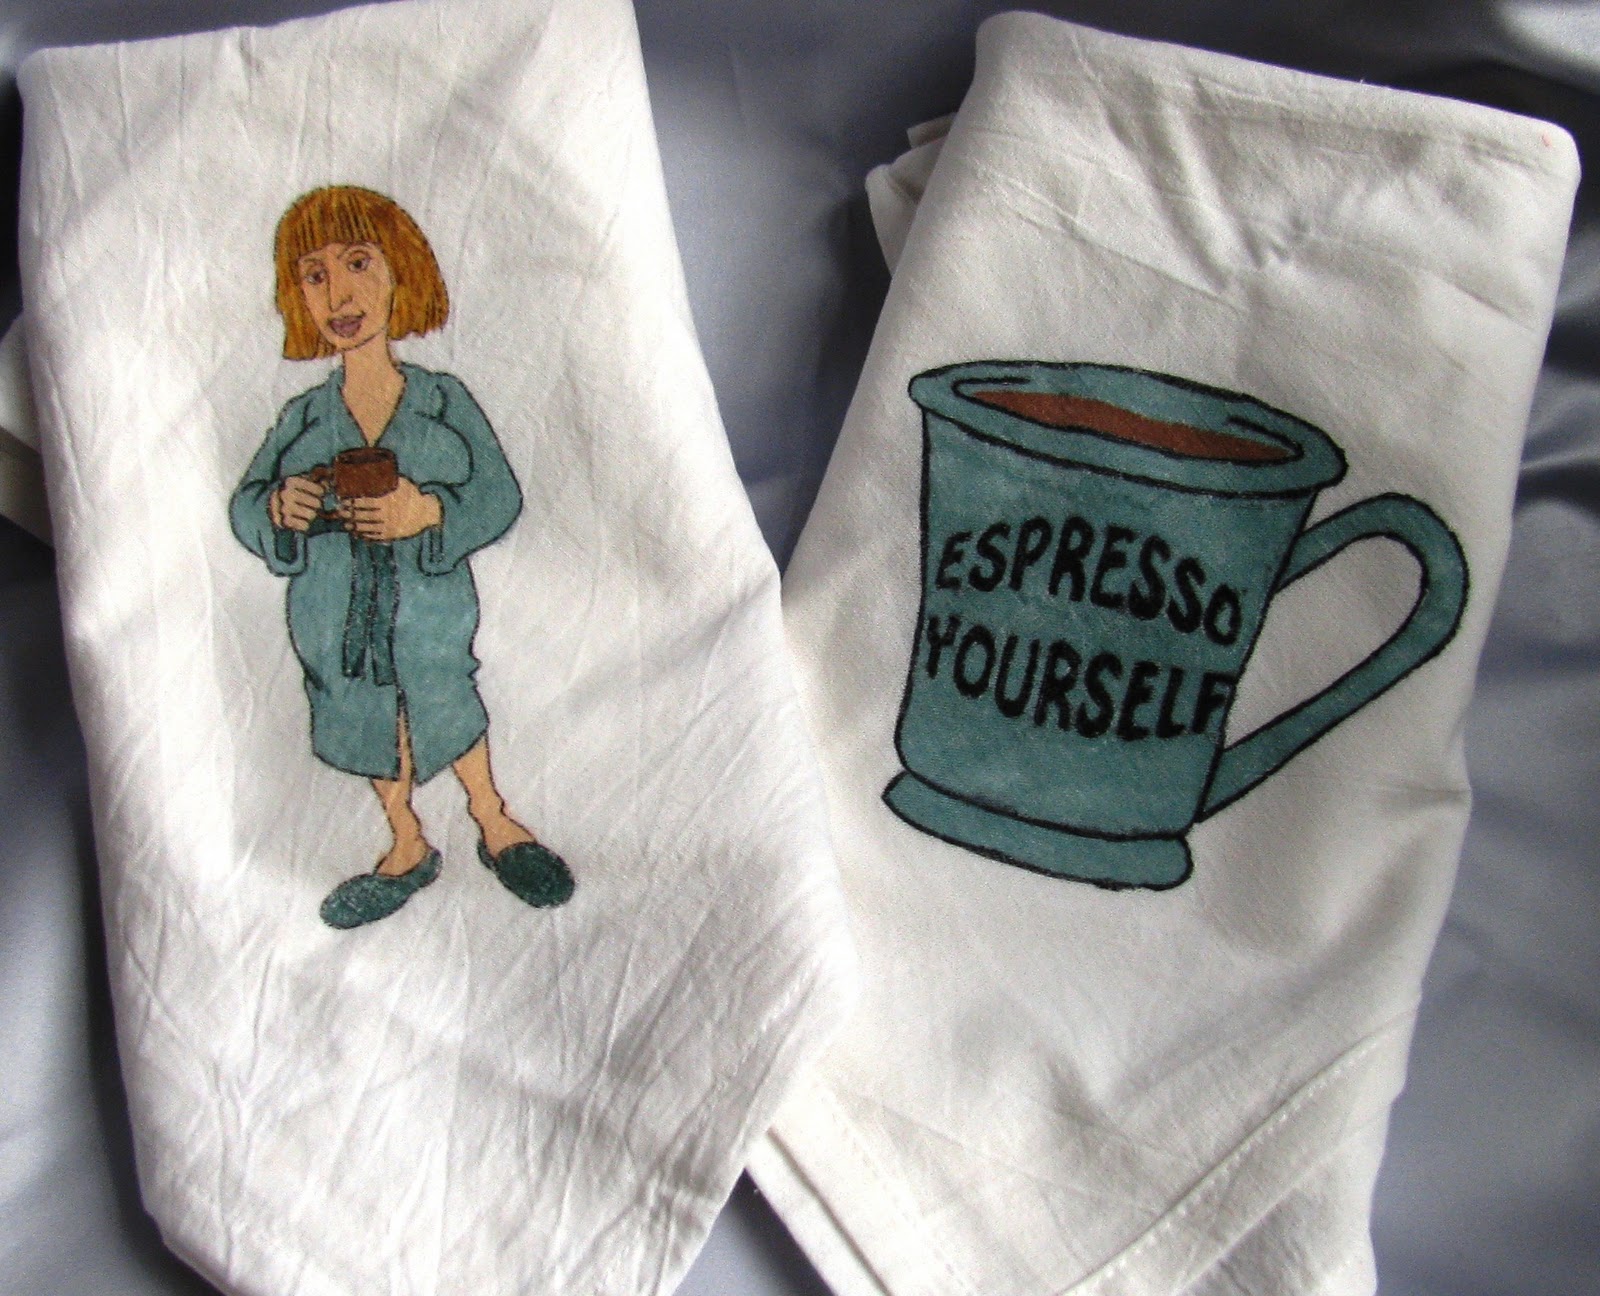
I attempted something a little different for this week's challenge at Totally Stampalicious to make a card or project with the theme of a hot cuppa.... I used an older set from Totally Stampalicious, but one of my favorites...Coffee Brawd. I used the digi version to print the images on computer printer iron-on transfer sheets that I picked up at one of the craft stores. It really worked pretty well! The images transferred easily and colored up nicely with Copic markers. The only glitch I had was forgetting to reverse the sentiment image when I printed it. It was easy enough to trace over the outline with a black Copic and then color in the other side. Since the Copic color is visible on the reverse side anyway, it really didn't matter.
Subscribe to:
Posts (Atom)